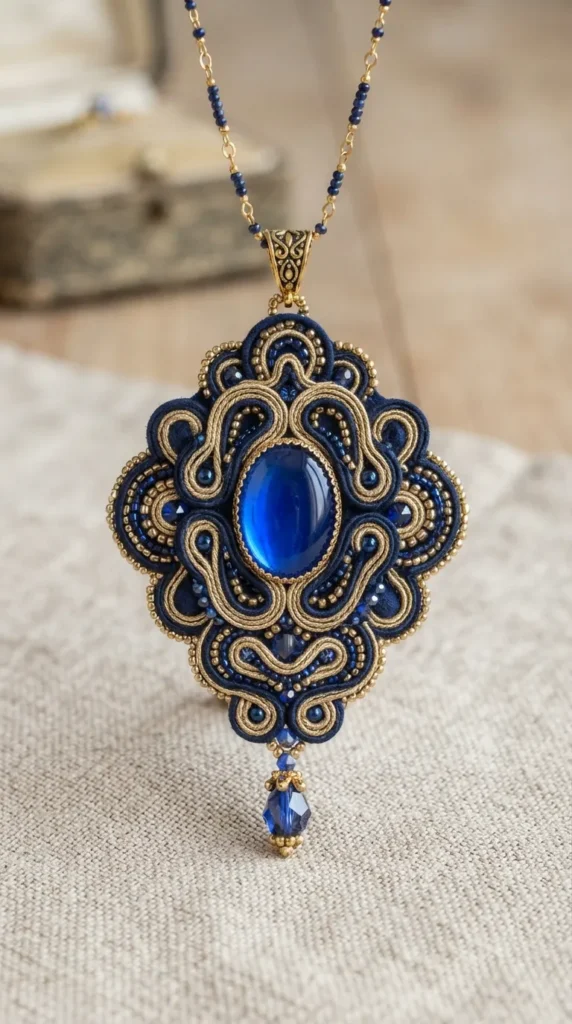
There is a distinct magic in wearing something nobody else owns. In a world of mass production and fast fashion, jewelry has transitioned from a mere accessory to a form of personal storytelling. When you craft a necklace by hand, you aren’t just assembling beads or bending wire; you are weaving intent, time, and personal aesthetic into a wearable piece of art.

Pinterest has become the ultimate digital gallery for this renaissance. A quick scroll through any curated style board reveals a clear shift away from high-shine, factory-stamped metal toward texture, organic shapes, asymmetry, and raw materials. From the effortless breeze of coastal beadwork to the structured elegance of wire-wrapped raw crystals, handmade necklaces are the defining focal points of modern outfits.

Creating your own jewelry is also deeply therapeutic. It forces you to slow down, work with your hands, and experiment with color theory and tactile design. Whether you are building a curated collection for your own wardrobe, crafting thoughtful gifts for loved ones, or designing high-performing pieces to feature on your social media feeds, this comprehensive guide will take you through 20 unique, realistic, and highly engaging DIY necklace ideas.


1. The Raw Quartz Wire-Wrapped Pendulum

Raw, unpolished crystals possess an organic silhouette that manufactured stones simply cannot replicate. The raw quartz pendulum necklace focuses on celebrating these natural imperfections. By using dead-soft brass or sterling silver wire, you can securely cage a rough crystal point while leaving its rugged facets exposed to catch the light.

Materials Needed:

  • A rough, natural quartz crystal point (approx. 1–1.5 inches)
  • 22-gauge dead-soft wire (gold, silver, or antique copper)
  • 26-gauge wire (for securing wraps)
  • Chain of choice (dainty cable chain works beautifully)
  • Needle-nose pliers and wire cutters

Step-by-Step Guide:

  1. Prepare the Base: Cut a 12-inch piece of your 22-gauge wire. Create a small, secure loop in the dead center using your round-nose pliers. This will serve as the top bail where your chain slides through.
  2. Anchor the Stone: Place the top of your crystal point just below the loop. Take the two lengths of wire extending from the loop and begin crossing them diagonally across the body of the crystal.
  3. Weave and Secure: Wrap the wire tightly around the contours of the stone. Use the thinner 26-gauge wire to bind the intersections if the crystal has a particularly slick surface. Ensure the wire tucks into natural grooves so the stone cannot slip out.
  4. Finish the Wrap: Bring the remaining wire ends back up to the base of the top loop, wrap them tightly around the stem two to three times, and snip the excess cleanly. Use flat-nose pliers to tuck the sharp edges inward.
  5. Assemble: Thread your dainty chain through the top loop.

2. Cottagecore Pressed Floral Resin Ovals

Capturing the fleeting beauty of spring is a core theme of the cottagecore aesthetic. This project involves embedding real, dried botanicals—such as tiny Queen Anne’s lace, forget-me-nots, or viola petals—into crystal-clear UV resin inside a delicate open-backed bezel.

Materials Needed:

  • Open-backed oval jewelry bezels (antique bronze or matte gold)
  • UV resin and a UV curing lamp
  • Dried, pressed micro-flowers and tiny leaves
  • Silicone mat and jewelry-grade packing tape
  • Tweezers and a toothpick

Step-by-Step Guide:

  1. Seal the Base: Press your open-backed bezel firmly onto the sticky side of jewelry packing tape. Place this setup onto your silicone mat to prevent leaks.
  2. The Base Layer: Pour a very thin, level layer of UV resin into the bottom of the bezel. Use a toothpick to pop any microscopic air bubbles. Cure under the UV lamp for 60 seconds.
  3. Arrange the Florals: Using tweezers, delicately arrange your dried flowers onto the cured base layer. Keep in mind that the “bottom” of the bezel on the tape will actually be the front of your necklace.
  4. The Top Dome: Slowly pour another layer of UV resin over the flowers until it forms a slight, beautifully rounded dome at the top of the bezel edge. Cure for another 2–3 minutes until completely hard.
  5. Final Clean: Peel the tape off the back. If the back feels slightly tacky, flip it over and cure that side under the lamp for another minute. Attach to a vintage-style brass chain.

3. Asymmetric Baroque Pearl and Paperclip Chain

The juxtaposition of classic luxury and industrial modernism defines this striking piece. Instead of a traditional, uniform strand of pearls, this design couples a chunky, structured paperclip chain on one side with an organic arrangement of irregular baroque freshwater pearls on the other.

Materials Needed:

  • 4–5 high-lustre baroque freshwater pearls (irregular shapes are preferred)
  • Chunky gold-filled paperclip chain
  • 24-gauge gold headpins
  • Large toggle clasp
  • Jewelry pliers

Step-by-Step Guide:

  1. Prepare the Pearl Segment: Slide a baroque pearl onto a gold headpin. Create a wrapped loop at the top of the pearl. Repeat this for all your pearls, connecting them directly to one another loop-to-loop to create a short, organic segment.
  2. Measure the Chain: Cut a length of paperclip chain that mirrors the length of your pearl segment, keeping in mind the total desired circumference of your necklace (usually around 16–18 inches for a collarbone fit).
  3. Join the Elements: Attach one end of the pearl strand to one side of your prominent toggle clasp. Connect the other end of the pearl strand to your length of paperclip chain.
  4. Complete the Circuit: Connect the remaining open end of the paperclip chain to the other half of the toggle clasp. The asymmetric split should sit clearly on your collarbone when worn.

4. Modernist Polymer Clay Terrazzo Arches

Polymer clay is an incredibly versatile medium that allows you to mimic high-end interior design trends like terrazzo marble. This minimalist, structural arch necklace uses neutral tones—cream, terracotta, sage, and charcoal—to create a wearable piece of mid-century modern art.

Materials Needed:

  • Polymer clay in white/cream (base) and various accent colors
  • Arch-shaped clay cutter
  • Acrylic roller or clay conditioning machine
  • X-Acto knife or tissue blade
  • Sandpaper (fine grit) and a hobby drill or thick needle
  • Jump rings and a minimalist cord or snake chain

Step-by-Step Guide:

  1. Create the Base: Roll out a sheet of your cream-colored polymer clay to a uniform thickness of about 3mm.
  2. Make the Terrazzo Flakes: Take tiny bits of your accent colors (terracotta, sage, black) and slice them into microscopic, irregular fragments using your blade. Scatter these flakes randomly over your rolled-out cream base.
  3. Embed the Flakes: Gently roll over the clay sheet with your acrylic roller to press the flakes flat into the base, creating a seamless terrazzo pattern.
  4. Cut the Shape: Press your arch cutter firmly into the clay sheet. Use a thick needle or a small straw tool to punch a clean hole at the very top of the arch before baking.
  5. Bake and Polish: Bake the clay according to the manufacturer’s instructions (usually 275°F for 15–20 minutes). Once cooled, gently sand the edges under running water for a smooth finish. Loop a jump ring through the hole and thread it onto a sleek chain.

5. The Mixed-Media Sea Glass Driftwood Choker

Perfect for an effortlessly coastal, bohemian look, this necklace combines the frosted, soft textures of beach-combed sea glass with a small piece of ocean-tumbled driftwood, strung on a simple genuine leather cord.

Materials Needed:

  • One small, smooth piece of sea glass (aqua, green, or white)
  • A miniature piece of naturally drilled or soft driftwood
  • 26-gauge silver wire
  • Dark brown or black round leather cord (1.5mm)
  • Sliding knot or cord-end crimps

Step-by-Step Guide:

  1. Bind the Sea Glass: Wrap the sea glass securely with fine silver wire, creating a delicate, artistic crisscross pattern around the center. Form a small wire loop at the top of the glass.
  2. Prepare the Driftwood: If your driftwood doesn’t have a natural hole, use a micro-drill bit to create a clean hole through its center.
  3. Thread the Elements: Pass your leather cord through the driftwood piece first, keeping it centered. Slide the wire loop of your sea glass pendant directly next to or underneath the wood so they nestle against one another naturally.
  4. Tie the Sliding Knots: To keep the piece casual and adjustable, finish the ends of the leather cord using a double sliding knot (fisherman’s knot) technique, allowing the wearer to adjust it from a tight choker to a mid-length necklace.

6. Venetian Dichroic Glass Mosaic Pendant

Dichroic glass shifts colors dramatically depending on the angle of the light. By assembling tiny, geometric shards of this iridescent glass inside a solid silver bezel, you can create a stained-glass mosaic effect that looks incredibly high-end.

Materials Needed:

  • Pre-cut dichroic glass mosaic micro-shards
  • Solid sterling silver bezel pendant blank
  • Two-part clear jewelry epoxy
  • Small wooden stir stick

Step-by-Step Guide:

  1. Plan the Layout: Before mixing your adhesive, dry-fit your glass shards inside the bezel blank. Arrange them like a puzzle, leaving microscopic gaps between the pieces to mimic authentic mosaic work.
  2. Mix the Epoxy: Carefully mix equal parts of your two-part jewelry epoxy, stirring slowly to avoid creating micro-bubbles.
  3. Apply the Base: Spread a thin layer of epoxy over the bottom floor of the bezel blank using your wooden stick.
  4. Set the Glass: Using fine tweezers, transfer your glass shards one by one into the epoxy-lined bezel, pressing them down firmly into place.
  5. Seal and Cure: Let the epoxy set completely for 24 hours in a dust-free environment. The clear adhesive will cure to a glass-like hardness, trapping the brilliant color-shifting properties of the glass beneath it.

7. The Victorian Velvet Ribbon Cameo

Vintage romanticism is seeing a massive resurgence on Pinterest. This piece utilizes a classic, matte-finished resin cameo profile set into an ornate filigree frame, suspended from a plush, rich jewel-toned velvet ribbon that fastens snugly at the nape of the neck.

Materials Needed:

  • Matte resin cameo cabochon
  • Ornate, vintage-style bronze filigree bezel setting
  • High-quality jewelry glue (E6000)
  • 15mm wide velvet ribbon (burgundy, emerald, or black)
  • Ribbon crimp ends, jump rings, and an lobster clasp

Step-by-Step Guide:

  1. Glue the Cameo: Apply a small bead of E6000 glue to the center of your bronze filigree setting. Press the cameo cabochon firmly into the center, holding it for 30 seconds to ensure a permanent bond. Let it dry flat.
  2. Measure the Ribbon: Cut your velvet ribbon to fit comfortably around your neck, subtracting about half an inch to account for the metal closures.
  3. Attach the Pendant: Find the exact center of your ribbon and slide a large jump ring around it, then hook your cured cameo pendant onto this jump ring.
  4. Secure the Ends: Place ribbon crimp ends onto both raw edges of the velvet ribbon. Use flat-nose pliers to squeeze the teeth of the crimps down securely into the fabric.
  5. Add Hardware: Connect a lobster clasp to one crimped end and an extension chain to the other using small jump rings.

8. Bohemian Tiered Leather and Turquoise Slab

Chunky, southwestern-inspired layering pieces add instant texture to minimalist summer outfits. This design features a vibrant, naturally veined turquoise slab focal piece suspended beneath a hand-cut, tiered leather crescent.

Materials Needed:

  • Genuine leather scrap (caramel, tan, or deep chocolate brown)
  • A flat, teardrop-shaped turquoise slab bead (top-drilled)
  • Heavy-duty leather hole punch
  • Antique brass jump rings and sturdy matching chain
  • Sharp fabric scissors

Step-by-Step Guide:

  1. Cut the Leather: Draw a neat crescent shape (about 2 inches wide) on the back of your leather scrap. Carefully cut it out with sharp scissors to ensure clean, unfrayed edges.
  2. Punch the Holes: Using your leather punch on its smallest setting, make a single hole at each of the two upper tips of the crescent (for the chain) and one hole in the dead center of the bottom curve (for the stone).
  3. Mount the Turquoise: Open a heavy-duty antique brass jump ring. Pass it through the top-drilled hole of your turquoise slab, then loop it through the center bottom hole of your leather crescent. Close the ring securely.
  4. Attach the Chain: Split your brass chain into two equal lengths. Attach one length to the left tip of the leather crescent and the other to the right tip using jump rings, completing your structural boho bib.

9. Minimalist Floating Herkimer Diamond Illusion Choker

The illusion necklace creates the mesmerizing effect of a brilliant gemstone resting completely unsupported on your skin. By utilizing ultra-clear, high-tensile nylon monofilament and a water-clear Herkimer diamond (a double-terminated quartz crystal), you achieve maximum sparkle with minimal visual weight.

Materials Needed:

  • One high-clarity Herkimer diamond crystal (center-drilled)
  • 0.25mm clear nylon illusion cord or fishing line
  • Two sterling silver crimp beads
  • Sterling silver spring ring clasp and jump rings
  • Crimping pliers

Step-by-Step Guide:

  1. Thread the Crystal: Slide your center-drilled Herkimer diamond onto the exact middle of a 16-inch strand of illusion cord.
  2. Anchor the Center: To prevent the crystal from sliding back and forth along the line when worn, slide a tiny crimp bead onto both sides of the crystal. Position them tightly against the stone’s edges and crush them flat using your crimping pliers.
  3. Finish the Ends: On one end of the clear cord, slide a crimp bead followed by a jump ring. Loop the cord back through the crimp bead and pull tight until the loop is tiny. Crimp it down securely and snip the excess cord flush.
  4. Attach the Clasp: Repeat the same process on the opposing side, substituting the jump ring for your spring ring clasp.

10. Abstract Textured Hammered Metal Discs

Metalworking can be intimidating, but creating gorgeous, light-catching textures on soft metals like brass or copper blanks is incredibly accessible. This piece uses geometric layering and raw textures to form an elegant, artisanal statement necklace.

Materials Needed:

  • 2–3 Raw brass circle stamping blanks (varying sizes: 15mm, 20mm, 25mm)
  • Jewelry chasing hammer (ball-peen side)
  • Steel bench block or a flat, hard anvil surface
  • Metal hole punch pliers
  • Polishing cloth and a fine chain

Step-by-Step Guide:

  1. Texturize the Blanks: Place your largest brass blank flat onto the steel bench block. Using the rounded ball-peen end of your chasing hammer, strike the brass surface repeatedly with firm, even pressure. This creates beautiful, dimpled, organic facets that reflect light like water.
  2. Repeat and Layer: Texture your smaller blanks in the same manner. You can vary the texture by striking harder or using different angles.
  3. Punch Connecting Holes: Use your metal hole punch pliers to create a clean hole at the top edge of each disc.
  4. Assemble the Stack: Nest the discs on top of one another from largest to smallest, or connect them vertically in a drop formation using heavy-gauge jump rings.
  5. Brighten the Metal: Rub the textured discs firmly with a jewelry polishing cloth to remove finger oils and bring out a bright, mirror-like gold finish before stringing them onto your chain.

11. Sculptural Chunky Wooden Bead Statement Choker

This design leans heavily into Scandinavian minimalism and architectural shapes. By painting select geometric raw wooden beads in bold contrast colors and leaving others raw, you create a striking balance between natural warmth and graphic modern design.

Materials Needed:

  • Large, unfinished geometric wooden beads (hexagons, spheres, cylinders)
  • Acrylic paints (matte black, cream, and terracotta)
  • Matte clear sealer or mod podge
  • Painter’s tape and small paintbrushes
  • Thick, structural cotton or hemp rope (4mm–6mm)
  • Large magnetic cord caps

Step-by-Step Guide:

  1. Tape and Paint: Wrap painter’s tape around half of a hexagonal wooden bead to create a clean, sharp color block line. Paint the exposed wood with matte black acrylic paint. Leave other beads completely raw or paint them solid cream.
  2. Seal the Work: Once the paint is fully dry, peel away the tape. Apply a thin coat of matte clear sealer over all the beads to protect them from moisture and skin oils.
  3. String the Pattern: Thread your prepared geometric wooden beads onto your structural cotton rope in a deliberate, balanced sequence (e.g., sphere, painted hexagon, cylinder, raw hexagon, sphere).
  4. Finish the Rope Ends: Cut your rope to a clean choker length. Apply a drop of strong jewelry adhesive inside your magnetic cord caps, push the raw, frayed ends of the cotton rope deep inside, and hold until set.

12. Celestial Sun and Moon Mixed-Metal Medallion

Mismatched metals—silver and gold worn together—are no longer a style faux pas; they are a major trend. This celestial talisman utilizes a bright silver disk base accented by an intricate, layered golden celestial stamping to create a high-contrast heirloom look.

Materials Needed:

  • A polished sterling silver disc blank (approx. 1 inch)
  • A smaller, detailed raw brass sunburst or crescent moon stamping charm
  • Two-part jewelry epoxy or specialized metal adhesive
  • Delicate sterling silver cable chain

Step-by-Step Guide:

  1. Clean the Surfaces: Clean both metal pieces thoroughly with rubbing alcohol to remove any residual manufacturing oils or fingerprints, ensuring a strong bond.
  2. Mix the Adhesive: Prepare a tiny batch of your clear two-part epoxy adhesive.
  3. Bond the Metals: Using a toothpick, place a tiny dot of epoxy onto the reverse side of your golden sunburst charm. Center it precisely onto the face of the larger silver disc blank. Press down firmly, wiping away any microscopic squeeze-out with a clean cotton swab.
  4. Let It Set: Allow the pendant to sit entirely undisturbed for 24 hours to achieve maximum cure strength.
  5. Style It: Thread the mixed-metal focal piece onto a bright silver chain, allowing the gold element to pop dramatically against the silver backdrop.

13. Vintage Botanical Embroidered Mini-Hoop

Textile art meets fine jewelry in this delicate, romantic piece. Using a miniature wooden embroidery hoop as a frame, you can hand-stitch a tiny botanical design onto raw linen fabric, creating an incredibly cozy, tactile pendant.

Materials Needed:

  • Miniature wooden embroidery hoop pendant kit (approx. 1 inch wide)
  • Raw flax linen or tight-weave cotton fabric
  • Fine embroidery floss (sage greens, dusty roses, soft creams)
  • Ultra-fine embroidery needle
  • Fabric glue or hot glue gun

Step-by-Step Guide:

  1. Stitch Your Design: Stretch your linen fabric into a standard large embroidery hoop first to keep it taut. Using 1–2 strands of embroidery floss, stitch a tiny botanical pattern, such as a simple lavender sprig or a minimalist daisy, using basic French knots and lazy daisy stitches.
  2. Mount the Mini Hoop: Center the mini hoop inner piece behind your finished embroidery. Push the outer mini frame over it, sandwiching the fabric tightly.
  3. Trim the Back: Flip the mini hoop over. Trim the excess fabric down to about a quarter-inch border. Fold these edges inward toward the center back and secure them neatly with a few drops of fabric glue.
  4. Seal the Frame: Glue the protective wooden backing plate included in your kit over the messy back of the fabric to seal the piece completely. Loop a vintage bronze chain through the top bail.

14. The Luxe Freshwater Pearl Silk-Knot Strand

The traditional method of knotting pearls on pure silk thread ensures that if the strand ever breaks, you lose only a single pearl. It also creates a soft, fluid drape against the body that cannot be mimicked by plastic or wire lines.

Materials Needed:

  • A strand of high-quality, matched freshwater pearls (6mm–8mm)
  • Pure silk bead-frenzy thread with an attached needle (Size No. 4 or 5)
  • Two bead tips (calottes)
  • Elegant filigree pearl clasp
  • Fine tweezers or a bead knotting tool

Step-by-Step Guide:

  1. Start the Strand: Tie a secure double knot at the long end of your silk thread. Thread on a bead tip so the knot rests snugly inside its cup.
  2. String and Knot: Slide your first pearl onto the thread, pushing it all the way down to the bead tip.
  3. Make the Knot: Form a loose overhand loop with the silk thread close to the pearl. Insert your fine tweezers into the loop, grab the silk thread right at the exit point of the pearl, and pull the loop closed. Use the tweezers to push the knot down tight against the pearl’s drill hole.
  4. Repeat the Pattern: Repeat this meticulous process for every single pearl: string a pearl, guide an overhand knot flush against its base, and pull tight.
  5. Finish Securely: Once your desired length is reached, slide on the final bead tip, tie a double knot inside its cup, snip the silk close, and add a dot of glue before closing the metal cup shut over the knot. Attach your pearl clasp.

15. Geometric Matte Ceramic Tile Mosaic Choker

Channeling Mediterranean courtyard tiles and vacation vibes, this design utilizes ultra-lightweight, square matte porcelain micro-tiles arranged in a neat geometric bar pattern along a rigid, structured metal choker wire.

Materials Needed:

  • 5–7 square matte ceramic or porcelain micro-mosaic tiles (8mm)
  • Rectangular flat metal blank or a rigid bar setting
  • Jewelry cement (E6000)
  • Rigid torque neck ring or memory wire choker loop

Step-by-Step Guide:

  1. Layout the Design: Arrange your ceramic tiles in a straight line, alternating colors (such as royal blue and crisp white) to create a Greek or Moroccan tile pattern.
  2. Affix to the Bar: Apply a thin, uniform line of jewelry cement across your flat metal bar backing.
  3. Set the Tiles: Carefully lay your ceramic tiles onto the adhesive, ensuring they are perfectly square and touching edge-to-edge without gaps. Press down firmly.
  4. Cure Time: Let the mosaic bar cure flat for 12 hours.
  5. Mount to Choker: Connect the two loops at the ends of your finished mosaic bar directly onto a sleek, rigid silver torque neck ring for a striking, modern look.

16. Upcycled Vintage Watch Movement Steampunk Pendant

There is an incredible, intricate beauty hidden inside non-functioning vintage mechanical watches. By salvaging the brass gears, ruby jewels, and textured steel plates of old watch movements, you can create a fascinating, historically rich conversation piece.

Materials Needed:

  • One vintage mechanical pocket watch or wristwatch movement (internal gears intact)
  • Ornate pendant tray that matches the diameter of the movement
  • Two-part crystal clear resin or jewelry glue
  • Antique bronze or gunmetal chain

Step-by-Step Guide:

  1. Extract the Movement: Carefully remove the internal mechanical movement from its old, damaged outer casing using small screwdrivers. Clean away any old grease using a soft brush dipped in isopropyl alcohol.
  2. Fit the Tray: Test-fit the round movement into your decorative pendant tray. If it fits snugly, remove it to apply your adhesive.
  3. Secure the Movement: Apply several drops of strong jewelry glue or mixed epoxy inside the bottom of the tray. Press the watch movement deep into the setting, ensuring the most visually interesting gears face upward.
  4. Optional Resin Seal: For a sleek, smooth finish, you can pour a crystal-clear layer of UV resin completely over the exposed gears to encase them forever under a smooth dome, or leave them raw for tactile texture. Connect to a dark gunmetal chain.

17. Vibrant Acetate Tortoiseshell Link Chain

Acetate jewelry is incredibly lightweight, bold, and high-shine. By purchasing open-loop acetate links in rich tortoiseshell patterns, you can snap them together to create a gorgeous, custom 1970s-inspired statement chain.

Materials Needed:

  • 20–25 Open-slot acetate tortoiseshell chain links (amber, blonde, or emerald swirl)
  • Oversized gold-plated spring ring statement clasp
  • Two large, thick gold jump rings

Step-by-Step Guide:

  1. Understand the Links: High-quality acetate jewelry links feature a microscopic, flexible pre-cut slit along one of their narrower sides.
  2. Assemble the Chain: Align the slit of one acetate link with the solid side of another. Push them against each other with gentle pressure; the link will flex open slightly and snap securely into the center of the next link.
  3. Build the Length: Continue snapping links together until your chain reaches a bold, chunky collar length (typically around 15–17 inches).
  4. Attach Hardware: Open your large gold jump rings. Loop one through the acetate link at each end of your chain.
  5. Finish with a Clasp: Attach your oversized gold statement clasp to one of the jump rings. This clasp can be worn at the back of the neck or pulled to the front as an extra design element.

18. Earthy Terracotta Clay Diffuser Medallion

This project blends functional wellness with minimalist style. By stamping intricate patterns into raw terracotta air-dry clay, you create a beautiful, porous pendant that can absorb and slowly diffuse your favorite essential oils throughout the day.

Materials Needed:

  • Terracotta air-dry clay or low-fire terracotta clay
  • Decorative linocut stamps or textured fabric (lace works beautifully)
  • Circular cookie cutter or small glass edge
  • Sandpaper
  • Soft suede or faux-leather cord

Step-by-Step Guide:

  1. Roll Out the Clay: Flatten your terracotta clay onto a clean surface using a rolling pin until it is roughly 4mm thick.
  2. Imprint Texture: Press your decorative stamp or a piece of textured lace firmly into the surface of the wet clay to leave a deep, beautiful impression.
  3. Cut the Shape: Use a round cutter to cut out your pendant medallion centered around the best part of the texture. Use a skewer to poke a generous hole at the top edge for your cord.
  4. Dry and Refine: Allow the terracotta clay to air-dry completely for 24–48 hours until light pinkish-orange and completely solid. Use fine-grit sandpaper to smooth any rough edges around the perimeter.
  5. String and Use: Thread your soft suede cord through the hole. To use, drop 1–2 drops of pure essential oil directly onto the unsealed back of the medallion.

19. Intricate Soutache Cord and Cabochon Bib

Soutache is a traditional textile trimming consisting of a narrow, flat braided cord. By wrapping these flexible cords tightly around glossy glass cabochons and hand-sewing them together, you can create breathtaking, flowing textile jewelry.

Materials Needed:

  • 3 metallic or silk soutache cords (contrasting colors like navy, gold, and cream)
  • Flat-backed glass cabochon stone
  • Heavy-duty bead embroidery thread and a fine beading needle
  • Ultra-suede or felt backing material
  • E6000 glue

Step-by-Step Guide:

  1. Glue the Stone: Glue your flat-backed cabochon onto a small scrap of felt backing material and let it dry. This gives you a solid foundation to sew your cords into.
  2. Wrap the Cords: Take three strands of soutache cord stacked flat against one another. Wrap them tightly around the perimeter of your glued cabochon.
  3. Stitch the Tracks: Thread your needle with fine thread. Pass the needle repeatedly through the central groove of all three soutache cords, stitching them directly into the underlying felt backing.
  4. Create the Swirls: Once you encircle the stone, take the loose ends of the cords and twist them into elegant, fluid curls or scrolls, stitching them down securely to the back of the piece to hide the raw ends.
  5. Trim and Finish: Trim away any excess visible felt backing fabric. Glue a clean, matching piece of ultra-suede over the messy stitches on the reverse side. Attach a delicate cord to the upper scrolls.

20. The Minimalist Liquid Silver Tube Curved Bar

For an ultra-sleek, high-fashion look that accentuates the collarbone, this minimalist design uses a gently pre-curved, polished sterling silver noodle tube threaded onto a matching liquid silver chain for an unbroken line of metallic shine.

Materials Needed:

  • One long, polished sterling silver curved noodle tube bead (approx. 2–3 inches)
  • High-shine sterling silver liquid silver chain or fine snake chain
  • Spring clasp and crimping hardware

Step-by-Step Guide:

  1. Thread the Bar: Slide your long, polished sterling silver curved tube bead directly onto the center of your high-shine chain. The natural curvature of the tube bead should follow the natural curve of your neck.
  2. Anchor the Position (Optional): If you prefer the bar to stay completely centered without sliding up and down the chain, place a microscopic silicone-lined slide bead inside both ends of the tube to hold the chain gently in place.
  3. Measure the Fit: Keep the chain relatively short (around 14–16 inches) so the structural silver bar rests prominently right in the hollow of your collarbones.
  4. Finish the Clasp: Secure the ends of your chain with a simple, high-polished sterling silver lobster or spring ring clasp to maintain the clean, industrial lines of the piece.

Mastering the Trend: Photography and Curation Tips

Once you have crafted your handmade necklaces, presenting them effectively on visual platforms like Pinterest is key to getting them noticed. Beautiful jewelry needs context to truly shine.

  • The Power of Styling: Avoid taking flat photos of your jewelry resting on a plain white table. Instead, style your necklaces over trending fabrics and textures—think raw wrinkled linen, rich velvet trays, naturally sun-bleached wood, or balanced carefully on the edge of a rustic ceramic dish.
  • Lighting is Everything: Harsh overhead lighting creates distracting, muddy reflections on metal, resin, and polished gemstones. Always opt for soft, indirect, natural morning sunlight near a large window. This reveals the genuine colors of your beads and the intricate details of your wirework without washing out your photography.
  • In-Context Shots: Showcase how the pieces drape on a real person. A styled collarbone shot showing how a necklace layers with an everyday outfit helps viewers visualize how they would style the piece themselves.

By combining thoughtful craftsmanship with clean, intentional aesthetics, your handmade jewelry projects can easily transform from a fun weekend activity into an inspiring, cohesive collection.